


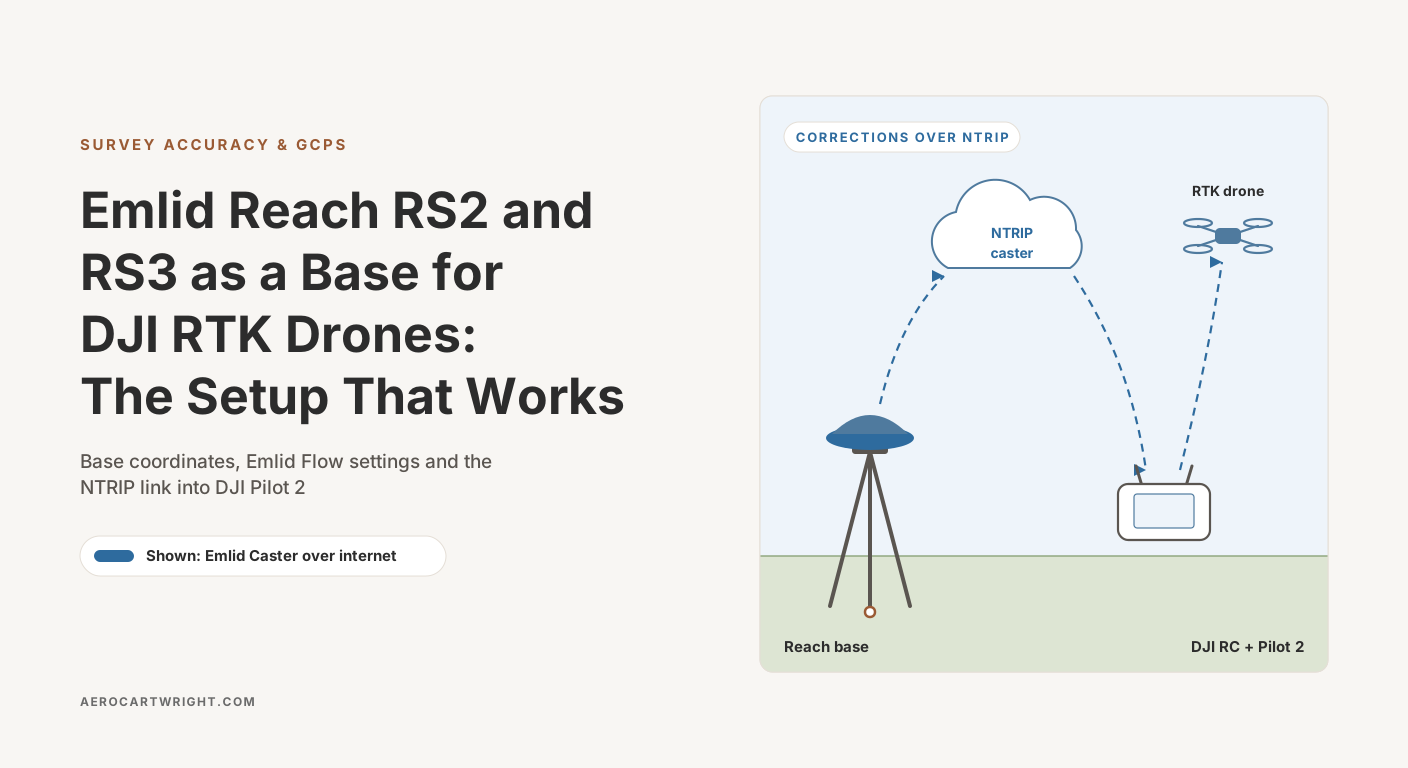
A drone mapper opens a fresh Matrice 4E box. DJI’s base station for it, the D-RTK 3, is sitting in his online cart. He has an Emlid Reach RS3 on his desk from a GCP project last month. The question: can the Reach do this job instead?
It can. It does it well. What it does not do any more is save money on the base alone. On 2 October 2026 the Reach RS2+ listed at $2,699 on Emlid’s store, while the D-RTK 3 listed at $2,150 at Blue Skies Drone Shop and $2,365 at Advexure. That puts the cheapest Reach RS-series receiver $334–$549 above DJI’s station. (Emlid’s Reach M2 module is cheaper at $749, or $1,023 with a GNSS antenna, but it is not an all-in-one RS-series receiver. Emlid also sells a Reach RS4 Drone Base Station Kit at $4,670.) The case for the Reach is that it is an open base: any NTRIP or RTCM3 rover can use it, and it fits a survey workflow that goes beyond DJI drones. The catch is that “do this job” hides a stack of decisions — internet caster versus local link, how you set the base coordinate, network RTK versus standalone — that the documentation does not walk through in one place.
This is that walkthrough. The configurations Emlid documents for DJI drones, the Emlid Flow settings, the gotchas with DJI Pilot 2 consuming the corrections, and an honest cost comparison against DJI’s own base.
Why Operators Pick a Reach Over DJI’s Base
DJI’s base station is the path of least resistance with DJI drones. The D-RTK 3 broadcasts corrections to DJI aircraft over the O4 Enterprise link, and its rover mode pairs over Bluetooth with the DJI Enterprise app (DJI D-RTK 3 specs; D-RTK 3 user manual) on an Android 10 or later phone (Advexure). Its predecessor, the D-RTK 2, is winding down: DJI’s store showed it as “not available in your country/region” on 2 October 2026, DJI’s D-RTK 2 page lists Phantom 4 RTK, Matrice 300 RTK and other older aircraft but not the Matrice 4 series, and US retailer DSLRPros lists it at $1,749 and tags it end-of-life.
So why pick a Reach?
Price is not the reason. An Emlid Reach RS2+ is $2,699, the RS3 $2,999 and the RS4 $3,899 on Emlid’s US store; the D-RTK 3 is $2,150–$2,365 at the two retailers above. The Reach wins on what it connects to, not on what it costs.
Open outputs. The Reach sends and receives RTCM 3.x corrections over Wi-Fi, Bluetooth, LoRa, USB, RS-232 and NTRIP (RS2+ datasheet). A non-DJI drone, another brand’s GNSS rover or your office software can take the same stream the DJI controller takes.
Base coordinates you can document. The Reach records RINEX with an OPUS preset built into Emlid Flow, and Emlid documents step-by-step workflows for OPUS, AUSPOS and NRCan CSRS-PPP as well as Average FIX against an NTRIP service (Emlid base setup methods). DJI has its own answers here: the D-RTK 3 can calibrate its position from network RTCM data and supports BeiDou PPP-B2b for decimeter-level positioning (Advexure product page), and DJI’s spec sheet gives three base-mode accuracies: single point 1.5 m horizontal / 3.0 m vertical RMS; satellite-based differential 30 cm / 40 cm RMS after a 20-minute convergence; and network RTK calibration 1.0 cm + 1 ppm horizontal / 3.0 cm + 1 ppm vertical RMS.
PPK either way. Both log raw observations. The D-RTK 3 does one-click local PPK with Matrice 4E data in DJI Terra 4.4 or later; the Reach’s RINEX goes into Emlid Studio or any PPK package.
For an operator whose work stops at “drone mapping with DJI gear,” the D-RTK 3 is the cheaper base and the more integrated choice. For an operator whose work spans surveying, mapping, monitoring and other vendors’ hardware, the Reach is the better foundation.
RS2+, RS3, and RS4: What Differs
As of 2 October 2026 Emlid’s store lists the Reach RS2+, RS3, RS4 and RS4 Pro, all usable as drone-RTK bases. The table covers the first three. The original Reach RS2 is no longer listed on the store, but plenty are still in service; it matches the RS2+ below except that its cellular modem is 3.5G rather than LTE (RS2 datasheet).
Reach RS2+. Dual-band L1/L2, 184-channel receiver, internal LoRa radio, built-in LTE modem, IP67. No tilt compensation. The entry point in Emlid’s RS line (RS2+ datasheet).
Reach RS3. Same receiver class and positioning spec as the RS2+, plus IMU tilt compensation and a second radio: a receive-only 410–470 MHz UHF radio on the TRIMTALK 450S protocol, which needs a separately sold antenna (RS3 datasheet). Tilt compensation is irrelevant for static base use but useful when the same Reach works as a GCP rover on other days.
Reach RS4. Emlid’s all-band receiver: L1/L2/L5/L6 across GPS, GLONASS, Galileo, BeiDou, QZSS and NavIC, 672 channels, tilt compensation, and a dual-band radio rated up to 2 W on UHF (RS4 datasheet). An RS4 Pro is also listed, at $4,599.
| Feature | RS2+ | RS3 | RS4 |
|---|---|---|---|
| Constellations | GPS/QZSS, GLONASS, Galileo, BeiDou | GPS/QZSS, GLONASS, Galileo, BeiDou | GPS, GLONASS, Galileo, BeiDou, QZSS, NavIC |
| Bands | L1, L2 | L1, L2 | L1, L2, L5, L6 |
| Channels | 184 | 184 | 672 |
| Built-in LTE | Yes | Yes | Yes |
| LoRa radio | 868/915 MHz, up to 8 km | 868/915 MHz, up to 8 km | 868/915 MHz, up to 8 km |
| UHF radio | — | 410–470 MHz, receive only (TRIMTALK 450S) | 410–470 MHz, up to 2 W (TRIMTALK 450S) |
| RTK precision (datasheet) | H 7 mm + 1 ppm, V 14 mm + 1 ppm | H 7 mm + 1 ppm, V 14 mm + 1 ppm | H 7 mm + 1 ppm, V 14 mm + 1 ppm |
| Convergence time | ~5 s typical | ~5 s typical | ~5 s typical |
| Battery | 16 hr as LTE RTK rover | 18 hr RTK with tilt; 22 hr logging | 16 hr RTK with tilt; 22 hr logging |
| Tilt compensation | No | Yes (IMU) | Yes |
| Weight | 950 g | 950 g | 927 g |
| Ingress protection | IP67 | IP67 | IP68 |
| Emlid US store price, 2 Oct 2026 | $2,699 | $2,999 | $3,899 |
Specs are from Emlid’s datasheets linked above; LoRa range is Emlid’s line-of-sight figure. Prices are the store’s base “Free year” listing for RS2+, RS3 and RS4; each also comes in a “+3 years of corrections” bundle ($3,898 for the RS2+).
For pure base-station duty, the RS2+ is the value pick: the base sits still, so tilt compensation adds nothing. Pay for the RS3 or RS4 when the same unit will also walk GCPs.
The Two Paths: Emlid Caster vs Local NTRIP
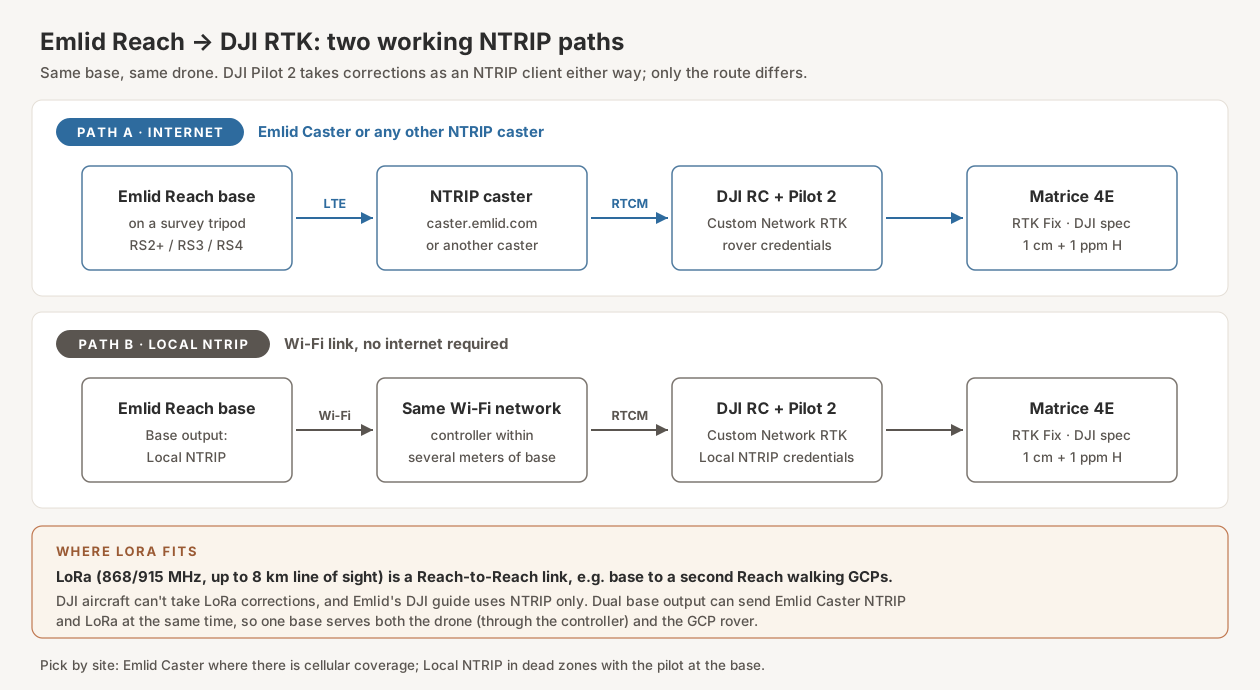
The DJI side of this is fixed: DJI Pilot 2 takes corrections as an NTRIP client through its Custom Network RTK setting. Emlid’s DJI RTK integration guide documents two ways to get the Reach’s corrections into that NTRIP client. The choice depends on internet coverage and how far the pilot will stand from the base. Emlid’s guide names the Phantom 4 RTK, Mavic 3E and Matrice 300 RTK, not the Matrice 4E; the 4E takes NTRIP corrections through the same Custom Network RTK setting in Pilot 2, as RTKdata’s Matrice 4 Enterprise RTK guide documents.
Path A: Emlid Caster Over the Internet
The Reach sends its corrections to an NTRIP caster over its internal LTE modem (or a Wi-Fi network with internet). The DJI controller connects to the same caster over its own internet connection, authenticates and pulls the corrections in real time. Emlid Caster is free, and you can use any other NTRIP caster instead.
Strengths: no range limit between base and controller beyond internet coverage at both ends; multiple simultaneous clients (the free Emlid Caster allows up to 10 rovers and 5 bases per account, per Emlid); easy to share with survey rovers and other software; the same workflow as a commercial network RTK service.
Weaknesses: needs a data connection at the base and at the controller, a data plan for the base SIM, and dependence on the caster service. Emlid’s paid Caster Pro tier was discontinued at the end of January 2026, per Emlid staff on the Emlid community forum; the free caster continues.
Path B: Local NTRIP Without Internet
Emlid Flow’s Local NTRIP option lets the Reach serve corrections as an NTRIP caster over Wi-Fi, without internet. The DJI controller joins the same Wi-Fi network as the Reach and pulls corrections directly. No internet, no SIM, no caster account.
Emlid’s limits on this path are strict: it works only if your DJI controller supports a Wi-Fi connection, and Emlid says to “keep the distance between the drone’s controller and your base within several meters” (Emlid DJI integration guide). The drone flies the mission as usual; the pilot stays next to the base.
Strengths: works in cellular dead zones, no data cost, no third-party service.
Weaknesses: the controller is tied to the base location, and Emlid’s guide describes one controller next to the base, not a site full of devices. Emlid’s dual base output table only rules out using the same channel for both outputs, so pairing Local NTRIP for the controller with LoRa for a GCP rover is not excluded.
Where LoRa Fits
The Reach’s internal LoRa radio (868/915 MHz, up to 8 km line of sight per the datasheets) is for Reach-to-Reach links. Emlid’s DJI guide does not use it. In a drone workflow, LoRa carries corrections from your base to a second Reach walking GCPs, while the drone takes the same base over NTRIP. Dual base output can send Emlid Caster NTRIP and LoRa at the same time.
For most operators with cellular coverage, Path A is the default. Path B is the answer for remote sites where the pilot can stand at the base.
Path A Walkthrough: Emlid Caster Setup
The configuration in Emlid Flow, following Emlid’s documentation:
- Mount and power the Reach over a known-coordinate marker if possible, or on a stable tripod over a point you will establish coordinates for.
- Connect to the Reach from your phone or tablet in the Emlid Flow app.
- Get the Reach online. Insert a SIM with mobile data and set it up in Emlid Flow, or join the Reach to a Wi-Fi network with internet access.
- Set the base coordinate. In Base settings, tap Configure, then choose a Coordinates entry method (Emlid base setup methods):
- Manual: Enter the known coordinates of the survey monument. Absolute centimeter accuracy, as good as the monument.
- Average SINGLE: The Reach averages its own standalone position. Emlid states the result is accurate to several meters, so this is a relative-only setup. Emlid does not publish a recommended averaging time.
- Average FIX: The Reach works as a rover against an NTRIP service while it averages, giving the base absolute centimeter accuracy.
- Online post-processing: Log raw data, submit it to OPUS, AUSPOS or NRCan, then enter the result manually. See the base point section below.
- Get Emlid Caster credentials. Sign up at caster.emlid.com. The caster generates the mount points and credentials for your base and your rovers; you do not invent them (Emlid Caster guide).
- Configure the corrections output. Tap Base output, select NTRIP, tap Edit and enter the base credentials from the caster page: address, port (usually 2101), password and mount point. For RTCM3 messages, Emlid’s recommended base output is 1006 (station coordinates) at 0.1 Hz, the MSM4 observation messages 1074 (GPS), 1084 (GLONASS), 1094 (Galileo) and 1124 (BeiDou) at 1 Hz, and 1230 (GLONASS code-phase biases) at 1 Hz. For older third-party receivers Emlid suggests the legacy 1004 and 1012 instead, with 1008 and 1033. DJI does not publish a required-message list for its aircraft; its D-RTK 3 spec sheet lists support for RTCM 3.0–3.3 and MSM4–MSM7, so start with Emlid’s MSM4 set.
- Verify the base is streaming. Check on your Emlid Caster page that the base’s mount point is connected before you go to the controller.
- Configure DJI Pilot 2. In the Flight Dashboard, open Drone Settings → RTK, choose Custom Network RTK and enter the rover credentials from the caster page: NTRIP Host, Port, Account, Password and Mount Point (Emlid DJI integration guide).
- Confirm RTK FIX on the controller before you fly.
Common failures:
- Base credentials in the controller. The caster issues separate credentials for the base and for rovers; the controller needs the rover set.
- No internet at one end. The base can stream perfectly while the controller has no connection, or the other way round. Check both.
- Connection test indoors. DJI Pilot 2 sends the aircraft’s position to the caster as NMEA GGA, and if NTRIP connects before the aircraft has a GNSS fix, that GGA reports coordinates of 0,0 (RTKdata’s DJI Pilot 2 guide). A caster that uses GGA to choose or check the stream can reject that, so an indoor test can fail even when the Reach side is broadcasting cleanly. Run the verification step outside on a clear sky before declaring the chain broken.
Path B Walkthrough: Local NTRIP
From Emlid’s DJI integration guide:
- Set the base coordinate as in Path A, step 4.
- In Emlid Flow, tap Base output and select Local NTRIP.
- Tap the Information button to open the page with the rover credentials.
- Connect the DJI controller to the same Wi-Fi network as the Reach. The controller must support Wi-Fi.
- Configure DJI Pilot 2 exactly as in Path A, step 8, using the Local NTRIP credentials.
- Keep the controller within several meters of the base for the whole flight, and confirm RTK FIX before takeoff.
The bottleneck is the short Wi-Fi link between the base and the controller. For projects where cellular coverage is bad and the pilot can work from the base, this works. Everywhere else, Path A is simpler.
The Base Point Problem
The single most consequential decision in setting up an Emlid Reach as a base is what coordinate you assign to the base point. Emlid puts it plainly: “absolute accuracy will always depend on the accuracy of the base position” (Emlid base setup methods). If your base is off by 30 cm in the vertical, every camera position is off by 30 cm in the vertical, and your model is off by 30 cm in the vertical until you correct it with GCPs.
The options, in increasing order of absolute accuracy:
Average SINGLE. The Reach averages its own satellite positions with no corrections. Emlid states the base ends up accurate to “several meters,” with rover measurements “centimeter-precise only relative to the base” and absolute accuracy “at meter level” (Emlid Average SINGLE guide). Emlid publishes no accuracy-versus-time figures for longer averaging, so do not count on a long average to make this survey-grade. Use it for relative workflows: repeat flights over the same site referenced to itself, or projects where GCPs will carry the absolute position.
Average FIX against a network. If you have NTRIP access to a CORS network or commercial service, the Reach works as a rover against it while averaging, and Emlid states this gives the base “absolute centimeter accuracy” (Emlid Average FIX guide). The base inherits the network’s reference frame.
Known point, entered manually. Set up over a monument with published coordinates and type them in. Centimeter-level absolute, as good as the monument.
Online post-processing. Record the Reach’s raw observations as RINEX and submit them to a processing service. Emlid’s guides recommend at least 4 hours of data for the best accuracy from each of these services, and up to 24 hours depending on the accuracy you need:
| Service | Coverage | Accuracy and wait, per Emlid’s guides |
|---|---|---|
| OPUS (US NGS) | Mostly US (NOAA CORS network) | Centimeter-level; Emlid treats overall RMS under 3 cm as a good solution. Emailed result. |
| NRCan CSRS-PPP | Global | ~15 cm with ultra-rapid orbits (~60 min after each hour); ~5 cm rapid (~12 hours after each day); ~2 cm final (12 days after each week) |
| AUSPOS (Geoscience Australia) | Global (ITRF); GDA in Australia | ~5 cm with ultra-rapid orbits (3–9 hours after the survey); ~2.5 cm rapid (17–41 hours after) |
With OPUS or the rapid and final PPP products (not the ~15 cm ultra-rapid NRCan result), this is the survey-grade answer when no CORS network is available, and the results come back with uncertainty figures you can document in your project metadata. Emlid Flow has an OPUS logging preset: on the Logging screen, open the recording settings, pick the OPUS preset, choose RINEX and enter the antenna height. OPUS runs in two modes by file length: 15 minutes to 2 hours, or 2 to 48 hours. The 2-to-48-hour static mode is the one for a base point. Note the cost in time: the hours of logging come before the result, and the more accurate PPP orbit products arrive hours to days after that, so plan the base setup window accordingly.
A pragmatic rule: for mapping that will be tied to GCPs anyway, Average SINGLE is fine, because the GCPs absorb the absolute offset. For RTK-only mapping that must land in a real coordinate system, use a known point, Average FIX against a network, or post-processing.
If You Use a D-RTK 3: Setting It Over a Known Point
The base point problem is the same with DJI’s station. Left to position itself, the D-RTK 3 is a single-point base: DJI’s spec sheet gives 1.5 m horizontal and 3.0 m vertical RMS for that mode. DJI’s FAQ lists three ways to set its coordinate under Coordinate Calibration in the RTK settings: Network RTK calibration, PPP calibration, or manual calibration (DJI D-RTK 3 FAQ). Manual calibration is the equivalent of Emlid’s Manual entry: set the station over the mark and type in the coordinates.
DJI’s user manual covers the hardware side but not the known-point screens in Pilot 2. The Pilot 2 labels below come from SPH Engineering’s D-RTK guide for the Matrice 4E/4T and M400, so check them against your Pilot 2 version:
- Set up over the mark. DJI’s user manual calls for the survey pole and tripod kit (sold separately), a stable, level setup, and no obstructions more than 15° above the antennas’ horizontal plane. Do not move or re-angle the tripod or the station after leveling it.
- Switch to Base Station mode. Pressing the power button three times cycles the operating modes, and the mode indicator shows which one is active. The station has to be activated before first use; as a base, you can do that by following the prompts in Pilot 2 while it connects to the aircraft and controller, with the controller online.
- Connect it in Pilot 2. Open Precise Positioning Setting, enable RTK positioning, set the RTK service type to D-RTK Base Station and select the D-RTK 3.
- Enter the known coordinates. Open the D-RTK coordinate calibration, create a new calibration and choose manual. Pilot 2 pre-fills a position; SPH Engineering reports it was typically 2–4 m off the true location in their tests, so overwrite it. Enter the mark’s latitude, longitude and ellipsoidal height, plus the pole height (Heliguy’s summary of the calibration options). Two things I’d check before trusting it: that the height you type is ellipsoidal, not the NAVD 88 orthometric height that many control sheets lead with, and whether your Pilot 2 version wants the mark height and pole height separately or one antenna height, so the pole is counted once.
- Confirm RTK FIX before takeoff, then run the same five checks as in the verification section below. A checkpoint on a second known mark is the quickest way to catch a wrong height.
Leave the station where it is once the mission starts. DJI says the D-RTK 3 watches for movement, and if it detects any, the app shows a displacement warning and the flight mission is terminated, leaving you to bring the drone back and land it manually (DJI D-RTK 3 FAQ).
Network RTK and CORS Integration
A network does two jobs in this workflow.
First, it can fix your base coordinate. Average FIX, above, runs the Reach as a rover against the network for the averaging window, then you switch it to base duty with a network-grade coordinate.
Second, it can replace your base outright. DJI Pilot 2’s Custom Network RTK accepts any NTRIP service, so a drone can take network corrections directly with no Reach in the chain. You still want a rover for GCPs and checkpoints, and it should use the same network so the drone and the ground points share one reference frame.
The network options worth knowing about:
- Commercial networks — paid subscriptions with per-device licences. Point One Navigation lists its True RTK plan (stated 1–3 cm) at $750 per year per licence billed annually, or $85 per month billed monthly, and Virtual RTK (stated ~10 cm) at $350 per year or $40 per month.
- State and regional CORS networks — many are run by the state DOT, and access terms and cost vary by state; some are free with registration. Search for your state DOT’s real-time network (RTN) page, then confirm coverage, sign-up and terms on the operator’s own page before you plan a job around it.
- NOAA CORS — the national reference network that OPUS processes your data against.
For commercial work in cities and along corridors, network RTK is the simplest path. For rural and federal-land work, a standalone Reach with a post-processed base coordinate is often the better answer.
Fixed vs Float: What Each Status Means
The DJI controller and the Reach both report an RTK status that bottoms out at one of three values: Single, Float, or Fix.
Single. The receiver has a position from satellite ranging alone, no carrier-phase corrections applied. Expect meter-level error — Emlid describes its own standalone positions as “several meters.” If the drone reports “Single” during a flight, the imagery has positioning roughly equivalent to a consumer drone with no RTK.
Float. Corrections are being received and applied, but the integer ambiguities have not been resolved. Better than Single, not survey-grade. Common while a fix is being established or after a brief signal interruption.
Fix. Carrier-phase ambiguities resolved. This is what you want for the entire flight. DJI specifies the Matrice 4E’s RTK fix at 1 cm + 1 ppm horizontal and 1.5 cm + 1 ppm vertical (Matrice 4 series specs); Emlid specifies the Reach’s RTK at 7 mm + 1 ppm horizontal and 14 mm + 1 ppm vertical.
Emlid lists the Reach’s convergence time as about 5 seconds typically. After an obstruction blocks satellites (the drone passes behind a structure, the base loses cellular for a moment), the receiver can drop back to Float and has to re-fix. Photogrammetry processing can work around a few Float-tagged images in a mostly-Fix dataset, but treat Float-tagged camera positions as unreliable: if a meaningful share of the flight is Float, the absolute accuracy of the model degrades.
Causes of persistent Float (failure to reach Fix):
- Sky obstructions — flying near tall buildings, in canyons, under tree cover.
- Multipath — reflections from nearby metal structures or large water bodies confusing the receiver.
- Long baseline — the ”+ 1 ppm” in both specs is error that grows with distance between base and drone. For the Matrice 4E, 1 cm + 1 ppm horizontal is 1 cm + 1 cm = 2 cm at a 10 km baseline and 1 cm + 3 cm = 4 cm at 30 km, before any loss of fix. Keep the base close to the work.
- Ionospheric activity — during geomagnetic storms or near the equator at solar maximum, ambiguity resolution fails more often.
- Few shared satellites — base and drone need enough satellites in common, with good geometry.
- Wrong RTCM message set — if your Reach is outputting an RTCM message set that DJI does not parse fully, you may see Float with no Fix. Start from Emlid’s recommended MSM4 set in the Path A walkthrough above.
Field recovery: relocate the base for better sky view, wait out an active obstruction, restart the corrections stream, or fall back to PPK if the project allows.
Verifying the Workflow
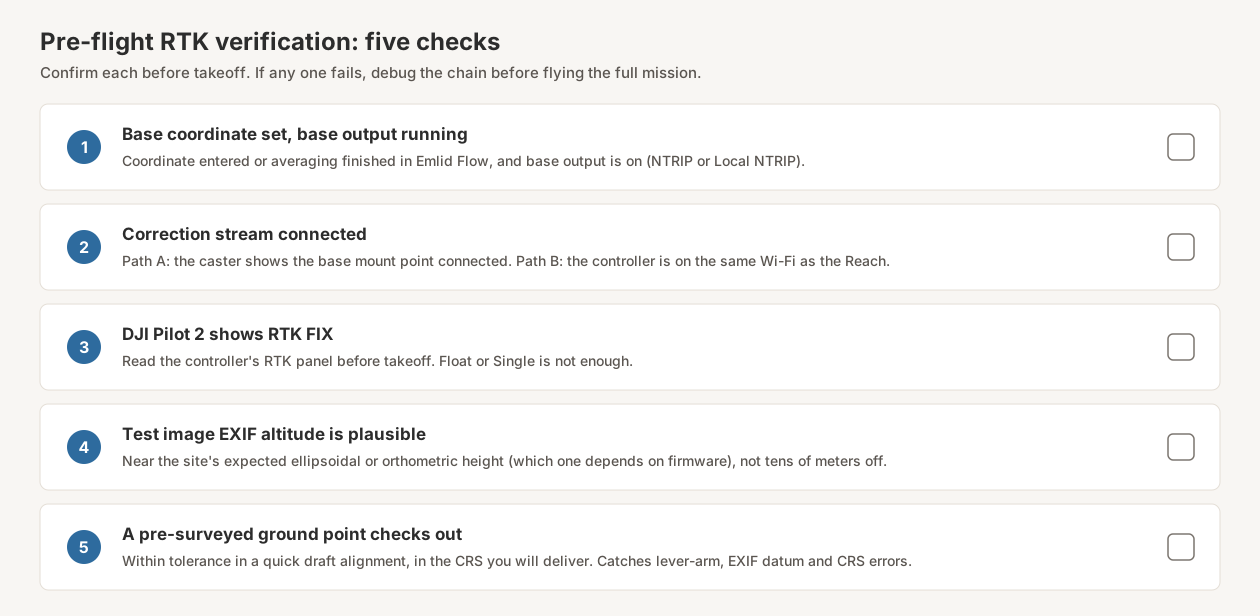
A flight should not be considered RTK-valid until you have verified the chain end-to-end. The five-minute check:
- The base coordinate is set — entered, or averaging finished — and Emlid Flow shows the base output running.
- The NTRIP caster shows the base mount point as connected (Path A), or the controller is on the same Wi-Fi as the Reach (Path B).
- DJI Pilot 2 shows “RTK FIX” in the controller’s RTK panel, not Float or Single.
- A test image’s EXIF altitude is plausible — pull it off the drone via USB or Pilot 2’s media browser and inspect it with ExifTool or your photogrammetry software. The altitude should be near your site’s expected ellipsoidal or orthometric height (which one depends on firmware), not off by tens of meters.
- A pre-surveyed ground point checks out in a quick draft alignment, within your project’s tolerance, in the coordinate system you will deliver. This catches lever-arm misconfigurations, EXIF datum surprises and CRS mismatches before the full processing run.
If any of these five fail, debug before flying the full mission. A bad chain produces clean-looking imagery with biased positioning that takes hours of post-processing to diagnose and may require re-flying.
Cost Comparison: Base Plus GCP Rover
One receiver cannot be base and rover at the same moment. If you want the drone and a GCP rover working off your own base on the same day, you need two receivers. List prices on 2 October 2026, excluding tripods, poles and the phone each system needs. The last column is hardware only, except the network row, which includes three years of subscriptions:
| Configuration | Arithmetic | Total |
|---|---|---|
| D-RTK 3 base + second D-RTK 3 as GCP rover (rover on network RTK; see below) | 2 × $2,150–$2,365 | $4,300–$4,730 hardware, plus the rover’s network subscription |
| Reach RS2+ base + RS2+ rover | 2 × $2,699 | $5,398 |
| Reach RS2+ base + RS3 rover (tilt on the pole) | $2,699 + $2,999 | $5,698 |
| Reach RS3 base + RS3 rover | 2 × $2,999 | $5,998 |
| No base, 3 years: one RS2+ rover, drone and rover on network RTK | $2,699 + 3 years of network fees | $2,699 (free state network) to $7,199 (two Point One True RTK licences, billed annually) |
The network row assumes one licence per device connected at the same time: 2 True RTK licences × $750 a year × 3 years = $4,500, plus $2,699 = $7,199. DJI’s spec sheet gives the D-RTK 3’s rover accuracy for network RTK, and neither the spec sheet nor the user manual documents a D-RTK 3 rover taking corrections from a second D-RTK 3 base, so the DJI row assumes the rover uses a network. Base-only, without a GNSS rover, it is one D-RTK 3 at $2,150–$2,365 against one RS2+ at $2,699.
On hardware alone, DJI’s pair is $668–$1,098 cheaper than the cheapest Emlid pair ($5,398 − $4,730 = $668; $5,398 − $4,300 = $1,098). That holds only if the D-RTK 3 rover has a free network to use. With one Point One True RTK licence for three years ($750 × 3 = $2,250), the DJI pair comes to $6,550–$6,980 ($4,300 + $2,250; $4,730 + $2,250), $1,152–$1,582 more than the $5,398 RS2+ pair, whose rover takes the Emlid base’s own corrections with no subscription. Beyond price, the difference is reach beyond DJI: the D-RTK 3’s rover mode works through the DJI Enterprise app on Android, and its base broadcasts to DJI aircraft, while the Reach pair serves any NTRIP or RTCM3 device and adds LoRa between the two receivers.
Tariffs. Section 232 duties on drone imports have applied since 3 September 2026, with duties on parts for most drones scheduled from 9 February 2027 (CBP guidance). Whether a given base station or GNSS receiver is classed as a drone part has not been settled in that guidance, so retail prices on DJI and Emlid gear may move. Our Section 232 tariff explainer tracks what is covered. Check the price on the day you buy.
The D-RTK 3 is the economical choice for operators who fly only DJI aircraft and need just a base, or who have a free network for a D-RTK 3 rover. Once the rover needs a paid network, a Reach pair costs less over three years, and the Reach is the better buy whenever corrections need to reach non-DJI hardware or you want RINEX-based base coordinates you can document.
Bottom Line
The Emlid Reach RS2+, RS3 and RS4 work as production base stations for DJI RTK drones. Emlid Caster over LTE is the default workflow for cellular-covered sites. Post-processing through OPUS, AUSPOS or NRCan covers the absolute-positioning gap for remote work. A Reach can be your base on one job and your GCP rover on the next, but a day with both a drone and a rover working off your own base needs two receivers.
Use Emlid Caster (Path A) when: cellular coverage is reliable, multiple devices need corrections, or the pilot needs to move away from the base.
Use Local NTRIP (Path B) when: there is no cellular coverage and the pilot can stay within several meters of the base.
Use LoRa when: a second Reach is walking GCPs within line of sight of the base.
Use post-processed base coordinates when: no CORS network is available, deliverables require absolute survey-grade accuracy, and you can log for hours and wait for the result.
Use network RTK as the base coordinate source when: you operate in a CORS-covered region and want the base in the network’s frame from the start.
The D-RTK 3 is not bad gear, and as a base on its own it is cheaper. It keeps you inside one vendor’s ecosystem; the Reach is an open alternative that also does the rest of your survey work.
Setup takes an afternoon to learn. After that, it disappears into the workflow — which is exactly what good infrastructure should do.