


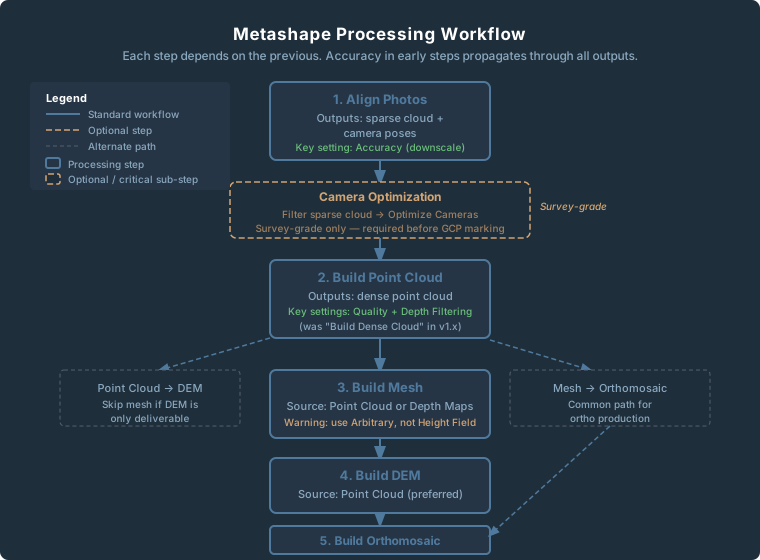
Updated October 2026: We updated menu and step names to Metashape 2.x (Build Model, Tools > Optimize Cameras, Point Cloud, and Tools > Tie Points > Clean Tie Points in 2.2, which is Model > Gradual Selection in 2.0 and 2.1), corrected what Agisoft’s manual says about the Highest accuracy setting, and replaced our blanket advice to use the Arbitrary surface type with the manual’s guidance: Height field for aerial photography of terrain, Arbitrary for buildings and other closed or vertical structures.
Every time you open a processing dialog in Agisoft Metashape, you get a row of dropdowns — Accuracy, Quality, Depth Filtering — with no explanation of what they actually change. The manual is thin. The tooltips are vague. Most practitioners either cargo-cult settings from a forum post or crank everything to Highest and wait.
There’s a better approach. Once you understand the one concept that underlies almost every Metashape processing setting, the tradeoffs become obvious and the presets write themselves. That concept: every quality setting is an image downscale multiplier. Metashape is not running a smarter algorithm at higher settings — it is running the same algorithm on a larger or smaller version of your images.
That’s it. That’s the whole mental model. Understand that, and you understand Metashape processing settings.
Align Photos
Alignment is where Metashape establishes camera positions. It detects feature points (keypoints) in each image, matches them across overlapping photos, and runs a bundle adjustment to solve camera positions and orientations simultaneously.
Accuracy: The Downscale Table
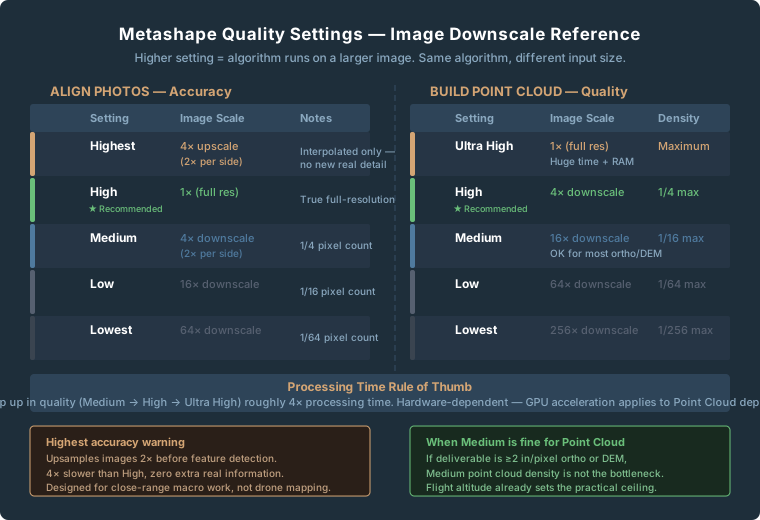
| Setting | Image Scale | Effective Pixel Count | Notes |
|---|---|---|---|
| Highest | 4x upscale (2x per side) | 4x original pixels | Upsampled — no new real detail |
| High | 1x (full resolution) | Original image size | True full-res detection |
| Medium | 4x downscale (2x per side) | 1/4 original pixels | Default in many older guides |
| Low | 16x downscale (4x per side) | 1/16 original pixels | Quick sanity check only |
| Lowest | 64x downscale (8x per side) | 1/64 original pixels | Almost never appropriate |
The Highest trap catches more people than any other Metashape setting. It upsamples — interpolates — your images to twice their original dimensions before running feature detection. Processing time roughly quadruples compared to High, and you gain nothing that wasn’t already in your original pixels. Agisoft’s Metashape 2.2 manual recommends Highest only for very sharp image data, and mostly for research purposes, because of the processing time. Use High for all standard commercial drone deliverables.
Key Point Limit
Keypoints are the raw feature candidates detected in each individual photo. The default is 40,000 per image.
For scenes with complex, fine-grained texture — gravel pits, vegetation canopy, dense urban areas — raising the limit to 60,000–80,000 improves tie point density. Setting it to 0 (unlimited) is appropriate for demanding survey-grade workflows. Setting it to 0 increases memory and time cost.
Tie Point Limit
After keypoints are matched across images, the surviving matched pairs become tie points. The default limit is 4,000 per image.
If alignment succeeds but camera optimization produces reprojection errors above 1.0 pixel, increasing tie points to 10,000–20,000 often helps before anything else. Setting tie points to 0 (unlimited) retains all surviving matches — use this for survey-grade workflows where GCP accuracy is a deliverable requirement.
Adaptive Camera Model Fitting
Leave Adaptive Camera Model Fitting on for all drone mapping work. It tells Metashape to evaluate which camera calibration parameters are reliably observable from the image geometry — and to suppress estimation of parameters that can’t be well-constrained. Without it on flat nadir grids, the solver can overfit, producing the characteristic “bowl” or “dome” artifact in DEMs. Turn it off only for close-range photogrammetry with strong geometry, or when importing a pre-calibrated camera model.
Guided Image Matching
Guided Image Matching runs a second matching pass after initial alignment to recover tie points in difficult areas. The cost: processing time increases substantially, and results are non-repeatable. The same dataset processed twice can produce different tie point sets.
For standard commercial drone surveys with good overlap (75%+), leave Guided Image Matching off. Reserve it for troublesome datasets where standard alignment produced disconnected clusters or poor sparse cloud density.
Build Point Cloud
In Metashape 2.x, the former “Build Dense Cloud” step was renamed “Build Point Cloud.” The algorithm is unchanged — the rename was strictly a terminology update. Python scripts referencing buildDenseCloud will fail in 2.x.
Quality: The Other Downscale Table
| Setting | Image Scale | Point Density vs. Ultra High | Notes |
|---|---|---|---|
| Ultra High | 1x (full resolution) | Maximum | Enormous time and memory cost |
| High | 4x downscale (2x per side) | 1/4 of Ultra High | Best balance for most work |
| Medium | 16x downscale (4x per side) | 1/16 of Ultra High | Acceptable for large-area surveys |
| Low | 64x downscale (8x per side) | 1/64 of Ultra High | Preview only |
| Lowest | 256x downscale (16x per side) | 1/256 of Ultra High | No practical use for deliverables |
For the majority of commercial drone deliverables, Medium quality point cloud is not the bottleneck. If you’re producing a 2-in/pixel orthomosaic and a 3-in/pixel DEM for a construction site progress map, the point cloud density at Medium is sufficient. Upgrading to High matters for detailed structure inspection, high-relief terrain where depth accuracy drives volumetric calculations, or when the mesh or point cloud is itself the deliverable.
Depth Filtering
| Setting | Behavior | When It’s Wrong |
|---|---|---|
| Disabled | No filtering — all depth values kept | Extremely noisy; nearly never useful |
| Mild | Conservative — obvious outliers removed | Use when fine detail preservation matters |
| Moderate | Balanced — good general-purpose default | Minor edge detail loss |
| Aggressive | Heavy removal of low-confidence points | Destroys legitimate thin features |
Aggressive filtering causes problems on forest canopy, heritage sites, and any scene where thin features carry measurement significance. Moderate is the right default for construction, agriculture, and general topographic work.
Build Model (Mesh)
In Metashape 2.x the mesh step is Workflow > Build Model.
Source Data: Point Cloud vs. Depth Maps
Point Cloud source: Metashape reconstructs the mesh from the already-computed dense point cloud. Use this when you need to clean and edit the point cloud before mesh generation, or when the LAS/LAZ file is a deliverable.
Depth Maps source: Metashape builds the mesh directly, skipping the standalone point cloud step. Faster, GPU-accelerated. Use this when the mesh is just an intermediate product for DEM or orthomosaic export and you won’t be delivering or cleaning a standalone point cloud.
Surface Type: The Height Field Trap
Arbitrary reconstructs a true 3D surface — overhangs, vertical walls, bridge underdecks. Agisoft says it should be selected for closed objects such as statues and buildings, at the cost of higher memory use. Required for any genuine 3D deliverable.
Height Field treats the scene as a 2.5D surface — each XY position gets one Z value. No overhangs. Agisoft’s manual says it is optimized for planar surfaces such as terrain and bas-reliefs and “should be selected for aerial photography processing,” because it needs less memory and handles larger datasets.
The trap runs both ways. Height Field can’t represent building walls or overhangs, so a mesh that has to show facades or vertical structure needs Arbitrary. Height Field also uses the bounding box to define the reconstruction plane: the manual tells you to check that the box is correctly oriented, because a tilted box distorts the surface even on flat terrain.
Use Height Field for standard aerial mapping of terrain (and remember the mesh is optional when the DEM and orthomosaic are the deliverables). Switch to Arbitrary when the mesh itself must capture buildings, structures, or other vertical and overhanging surfaces.
Build DEM
Always use Point Cloud source when you have one — it’s the most accurate representation of your surveyed surface. Use Depth Maps as a fallback if you skipped the point cloud step.
With interpolation enabled, Metashape fills areas with no point cloud coverage. Enable for standard commercial deliverables. Disable for precision survey deliverables where data gaps are scientifically meaningful and need to be visible.
Don’t set resolution finer than your point cloud spacing — you’re just interpolating without adding real data. The practical floor is roughly 2x your camera GSD at flight altitude.
Build Orthomosaic
Blending Modes
Mosaic is the default and right choice for nearly all drone mapping work. It decomposes image data into multiple spatial frequency bands and blends each independently — sharp detail everywhere, smooth color gradients across seams.
Average calculates the mean pixel value from all overlapping images. Output is softer but color is more consistent. Useful when lighting changed significantly during the flight and you’d rather have a gradual color gradient than sharp tonal jumps at seam lines.
Natural (new in Metashape 2.3) selects the best source pixel per triangle based on sharpness, shooting angle, and distance. Early reports suggest it reduces exposure artifacts at seam lines. Still early for production use.
Refine Seamlines
Runs an algorithm to relocate seam lines away from roof edges and building walls where projective distortion causes mismatched geometry. Enable for any urban or suburban project with structures.
Hole Filling
Enable for client deliverables where complete coverage is expected. Disable when reviewing coverage quality — you want to see exactly where the gaps are, not have them papered over.
Camera Optimization: The Setting That Actually Controls Accuracy
Camera optimization — Tools > Optimize Cameras — doesn’t appear in the Build dialogs, but it matters more for survey-grade accuracy than any quality setting in any dialog. (What “survey-grade” means as an actual number — RMSE, CE90, and ASPRS accuracy classes — is covered in the drone survey accuracy guide.)
The workflow: after alignment, use Tools > Tie Points > Clean Tie Points in Metashape 2.2 (Model > Gradual Selection in 2.0 and 2.1) to filter the tie points (the sparse cloud) by reprojection error (below 0.5 px), reconstruction uncertainty (below 10), and projection accuracy (below 3). Delete the flagged points. Then run Optimize Cameras. GCP residuals below 0.05 ft require both well-distributed control and a well-optimized camera model. The quality sliders in the dialogs don’t substitute for this step.
Practical Presets
Quick Client Preview
| Step | Setting |
|---|---|
| Align Photos — Accuracy | Medium |
| Key Point Limit | 40,000 (default) |
| Build Point Cloud — Quality | Low |
| Depth Filtering | Moderate |
| Build DEM | Point Cloud source, Interpolation on |
| Build Orthomosaic | Mosaic, Hole filling on |
Rough estimate, not a benchmark, for a 500-image dataset on a mid-range workstation: 45–90 minutes.
Standard Commercial Deliverable
Construction progress, agricultural mapping, corridor surveys — orthomosaic and DEM are the deliverables.
| Step | Setting |
|---|---|
| Align Photos — Accuracy | High |
| Tie Point Limit | 4,000 (increase to 10,000 if optimization RMS exceeds 1.0 px) |
| Adaptive Camera Model Fitting | On |
| Build Point Cloud — Quality | High |
| Depth Filtering | Moderate |
| Build Orthomosaic | Mosaic, Refine seamlines on (urban), Hole filling on |
Rough estimate, not a benchmark, for a 500-image dataset on a mid-range workstation: 4–8 hours.
Survey-Grade Output
Boundary condition documentation, volumetric calculations, engineering deliverables.
| Step | Setting |
|---|---|
| Align Photos — Accuracy | High |
| Key Point Limit | 60,000 |
| Tie Point Limit | 0 (unlimited) |
| Adaptive Camera Model Fitting | On |
| Camera Optimization | Run after alignment — Clean Tie Points (reprojection < 0.5 px, reconstruction uncertainty < 10, projection accuracy < 3), then Optimize Cameras |
| Build Point Cloud — Quality | High |
| Depth Filtering | Mild |
| Build DEM | Point Cloud source, Interpolation off |
| Build Orthomosaic | Mosaic, Refine seamlines on, Hole filling off |
Rough estimate, not a benchmark, for a 500-image dataset on a mid-range workstation: 8–16 hours.
What Changed in Metashape 2.x
The core photogrammetric algorithms did not change fundamentally in version 2.x.
Renamed UI elements and API methods:
| Metashape 1.x | Metashape 2.x |
|---|---|
| Build Dense Cloud | Build Point Cloud |
| Dense Cloud (workspace) | Point Cloud (workspace) |
| Cameras (workspace) | Images (workspace) |
Python scripts using buildDenseCloud will throw errors in 2.x. Project files saved in Metashape 2.0 or later cannot be opened in 1.8 or earlier.
Notable additions by version:
- 2.0: LiDAR point cloud integration (Pro only), DEM editing tools
- 2.1: Matching graph visualization — shows camera connection quality
- 2.2: Improved GNSS/INS offset handling; Refine Seamlines for orthomosaics
- 2.3: Natural blending mode; Python upgraded to 3.12
Frequently Asked Questions
Should I always use Highest accuracy for the best results?
No. Highest upsamples your images to twice their original resolution before running feature detection. It adds no real information — just interpolated pixels — and processing time roughly quadruples compared to High. For drone mapping at any reasonable altitude, High is the appropriate ceiling. Agisoft’s manual recommends Highest only for very sharp image data, mostly for research purposes, because it is so time-consuming.
My DEM has a bowl or dome shape in the middle of a flat survey area. What’s causing it?
Almost always a camera model problem, not a data problem. The bowl/dome artifact is the signature of an over-parameterized bundle adjustment — the solver estimated distortion parameters it couldn’t reliably constrain from weak nadir geometry, and diverged. Confirm Adaptive Camera Model Fitting is enabled. Then check whether you ran Camera Optimization with a clean sparse cloud. If you didn’t filter outliers before optimizing, the camera model may be fitting to noise.
What’s the actual difference between Medium and High point cloud quality on a typical mapping job?
At typical commercial drone altitudes, you often can’t see the difference in the final deliverable. Medium quality on a 20 MP camera at 300 ft produces a point cloud at roughly 3–4 in/pixel spacing. A 2-in/pixel orthomosaic derived from that cloud looks essentially identical to one derived from a High quality cloud. The upgrade to High matters for terrain with significant height variation, precise volume calculations, or projects where the point cloud is itself a deliverable.
When should I use Depth Maps source instead of Point Cloud for mesh building?
When you don’t need to deliver or manually edit the point cloud separately. Depth Maps source is faster and GPU-accelerated, and for mesh-only workflows the result is comparable. Use Point Cloud source (called Dense Cloud before Metashape 2.0) when you need to clean the point cloud before mesh generation or when the LAS/LAZ file is a deliverable.
Aggressive depth filtering gives me a cleaner-looking point cloud — why shouldn’t I use it?
Because “cleaner looking” often means “data removed.” Aggressive filtering removes points that are geometrically consistent across only a few overlapping images. In scenes with real surface complexity — vegetation canopy edges, thin structures, carved surface detail — those points are real data. They look like outliers from some viewing angles because the feature is thin or partially occluded, not because they’re noise. Moderate filtering removes obvious errors without destroying real signal for typical commercial datasets.
My orthomosaic has a visible seam line across the middle of the project. What’s wrong?
A seam artifact that severe usually means either the blending mode is set to Disabled or there’s a significant exposure difference between flight lines. If your flight crossed from sun-facing to shadow-facing terrain, Average blending may produce a less jarring result. Also check that overlap is consistent across the seam area — thin overlap zones reduce the blending algorithm’s ability to find clean seam placement.
Related Reading
- From Raw Images to Orthomosaic in 90 Minutes — the full processing workflow from import to export
- WebODM vs Pix4D for Consumer Drone Mapping — how Metashape’s settings and accuracy compare to the alternatives